TL;DR:
- Common issues include soiling, shading, inverter faults, wiring problems, and temperature-related losses.
- Systematic troubleshooting involves monitoring data review, visual inspections, cleaning, and electrical checks.
- Regular maintenance and regional awareness help prevent performance drops and prolong system lifespan.
Your solar system was producing well last summer, but now your monitoring app shows output dropping by 20% or more. Maybe the inverter light has turned red, or your utility bill is creeping back up despite having panels on your roof. These situations are frustrating, especially when you’re not sure where to start. This guide gives you a clear, step-by-step troubleshooting workflow built specifically for residential solar systems in Washington and Oregon, where rain, pollen, shade, and seasonal weather patterns create unique challenges that generic guides simply don’t address.
Table of Contents
- Understanding the most common residential solar problems
- Preparation: Tools, safety, and prerequisites
- Step-by-step troubleshooting workflow
- Verifying results and ongoing maintenance
- A deeper perspective: Why efficient troubleshooting matters most in the Northwest
- Connect with trusted local solar service providers
- Frequently asked questions
Key Takeaways
| Point | Details |
|---|---|
| Identify common faults | Recognizing frequent issues like soiling and inverter errors sets up effective troubleshooting. |
| Prepare safely | Having the right tools and following safety steps prevents accidents and protects your equipment. |
| Follow systematic workflow | Step-by-step troubleshooting increases accuracy and reduces downtime for solar systems. |
| Verify improvements | Monitoring post-repair results ensures your panels maintain consistently high output. |
| Use local expertise | Adapting troubleshooting to Washington and Oregon conditions maximizes your solar investment. |
Understanding the most common residential solar problems
Before you grab a ladder or open your monitoring app, it helps to understand what category of problem you’re likely dealing with. Residential solar issues generally fall into two broad groups: physical faults and electrical faults. Physical faults include things you can see, like cracked panels, bird droppings, moss buildup, or shading from a tree that’s grown taller over the past year. Electrical faults are less visible and include wiring degradation, inverter failures, and communication errors in your monitoring system.
Here’s a quick breakdown of the most common issues homeowners report:
- Soiling: Dust, pollen, bird droppings, and moss accumulate on panel surfaces and block sunlight from reaching the cells. Soiling can cause a 0.4% output loss per day, adding up to roughly 10% monthly if panels go uncleaned.
- Temperature-related losses: Panels actually produce less electricity as they get hotter. This is a counterintuitive fact that surprises many homeowners.
- Shading: Even partial shading from a chimney, vent pipe, or nearby tree can significantly reduce output from an entire string of panels.
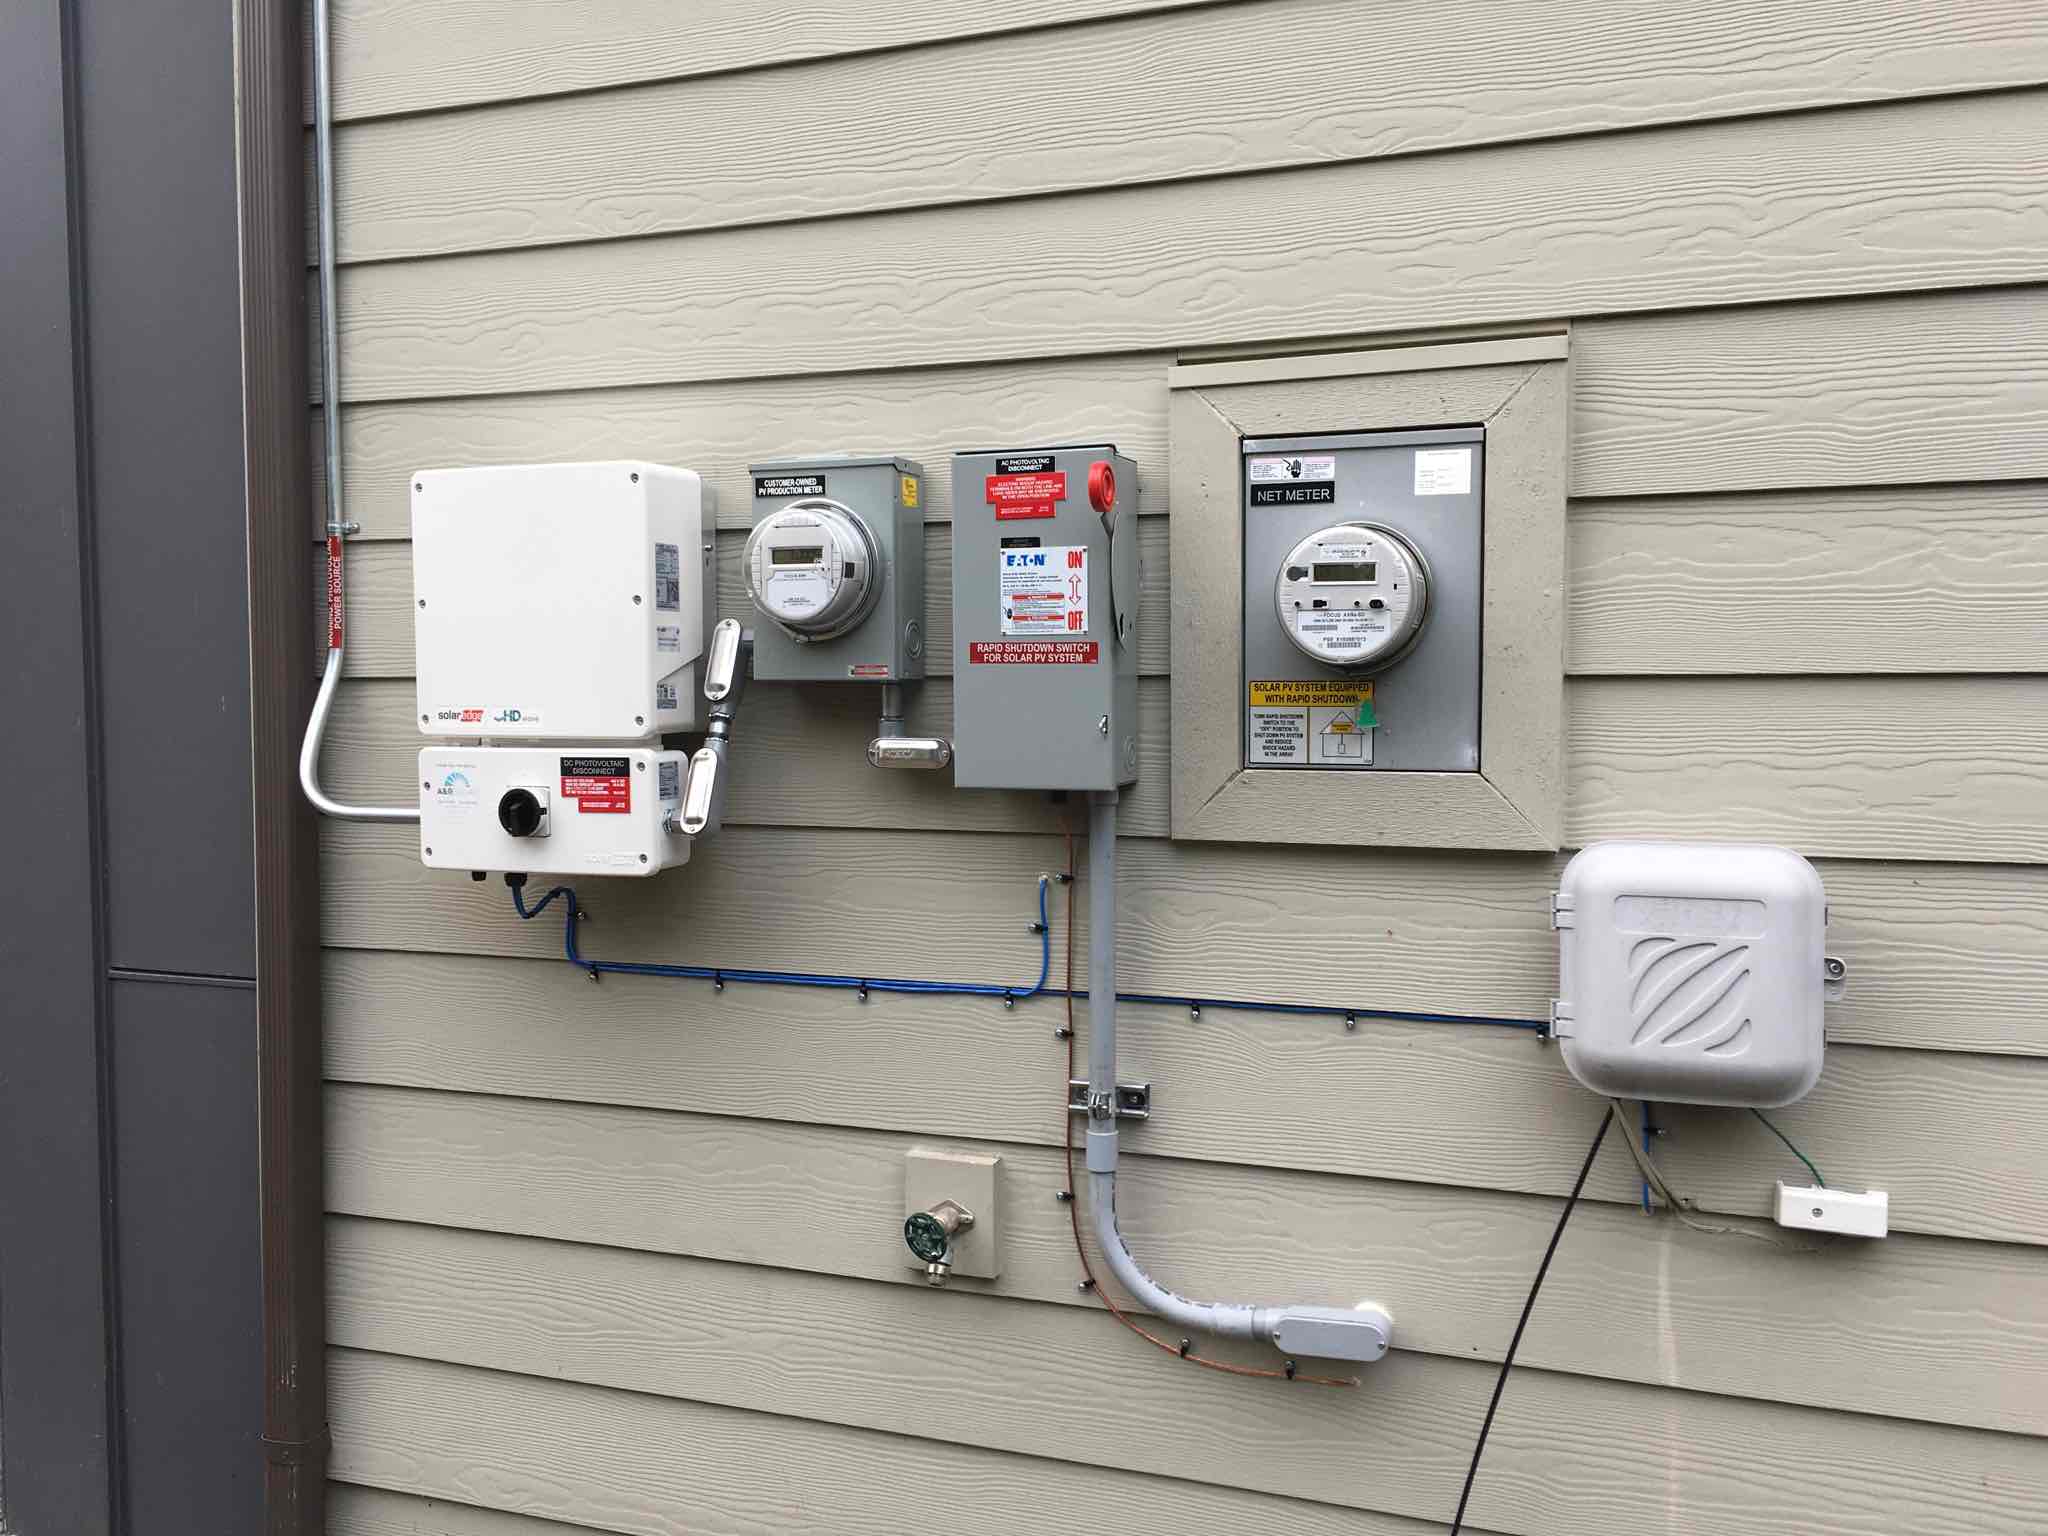
- Inverter faults: The inverter converts DC power from your panels into usable AC power. Error codes, overheating, or age-related wear can cause partial or complete output loss.
- Wiring and connection issues: Loose MC4 connectors, corroded junction boxes, or damaged conduit can interrupt current flow.
- Monitoring failures: Sometimes the system is working fine but the monitoring device has lost its Wi-Fi connection, creating a false alarm.
Understanding common solar panel problems in advance helps you avoid wasting time chasing the wrong issue.
Common fault categories and estimated impact
| Fault type | Typical output loss | DIY fixable? |
|---|---|---|
| Soiling (light dust/pollen) | 5–10% monthly | Yes |
| Shading (seasonal/new obstruction) | 10–40% | Partial |
| Inverter error code | 20–100% | Sometimes |
| Wiring or connector issue | Variable | No |
| Monitoring device failure | 0% actual loss | Yes |
| Panel damage (crack, delamination) | 5–30% per panel | No |
With a sense of the most common issues, let’s look at what’s needed to start troubleshooting.
Preparation: Tools, safety, and prerequisites
Rushing into troubleshooting without the right tools or safety measures is a mistake that can cost you time and create real hazards. Solar systems operate at high DC voltages, and rooftop work carries physical risks. A few minutes of preparation makes the entire process safer and more effective.
Essential tools to gather before you start:
- A multimeter capable of measuring DC voltage (up to 600V for most residential systems)
- Cleaning equipment: a soft-bristle brush, a garden hose with a gentle spray nozzle, and a bucket with mild, non-abrasive soap
- Your monitoring app or web portal login credentials
- A sturdy, properly rated ladder with non-slip feet
- Personal protective equipment: non-conductive gloves, safety glasses, and non-slip footwear
- A notepad or phone to record readings and error codes
Safety steps before any physical inspection:
- Check the weather. Never go on a roof during rain, wind, or when frost is present on the surface.
- Turn off the solar system using the AC and DC disconnect switches before touching any wiring. Your inverter manual will show the exact procedure.
- Inform someone in your household that you’re doing rooftop work.
- Never work alone on a roof.
“Panel surface temperatures can reach around 64°C on hot days, causing temperature losses as high as 12% in daily output. Cleaning and inspecting during cooler morning hours reduces both risk and measurement error.”
This is why timing your troubleshooting session matters. Early morning, when panels are cool and dew has settled, is the safest and most productive window for both cleaning and inspection.
Pro Tip: Before climbing onto the roof, open your monitoring app and take a screenshot of current production data. This gives you a baseline to compare against after you’ve completed each step.
| Task | DIY safe? | When to call a pro |
|---|---|---|
| Visual panel inspection | Yes | If you see physical damage |
| Panel cleaning | Yes | If panels are steep or slippery |
| Monitoring app review | Yes | If data is missing for weeks |
| Voltage testing at inverter | Experienced DIY only | If readings are abnormal |
| Wiring and connector checks | No | Always |
| Battery system diagnostics | No | Always |
A solid maintenance checklist can help you stay organized throughout this process. For anything involving live wiring or battery systems, professional maintenance is the right call.
Once you’re prepared, it’s time to move through the troubleshooting workflow step by step.
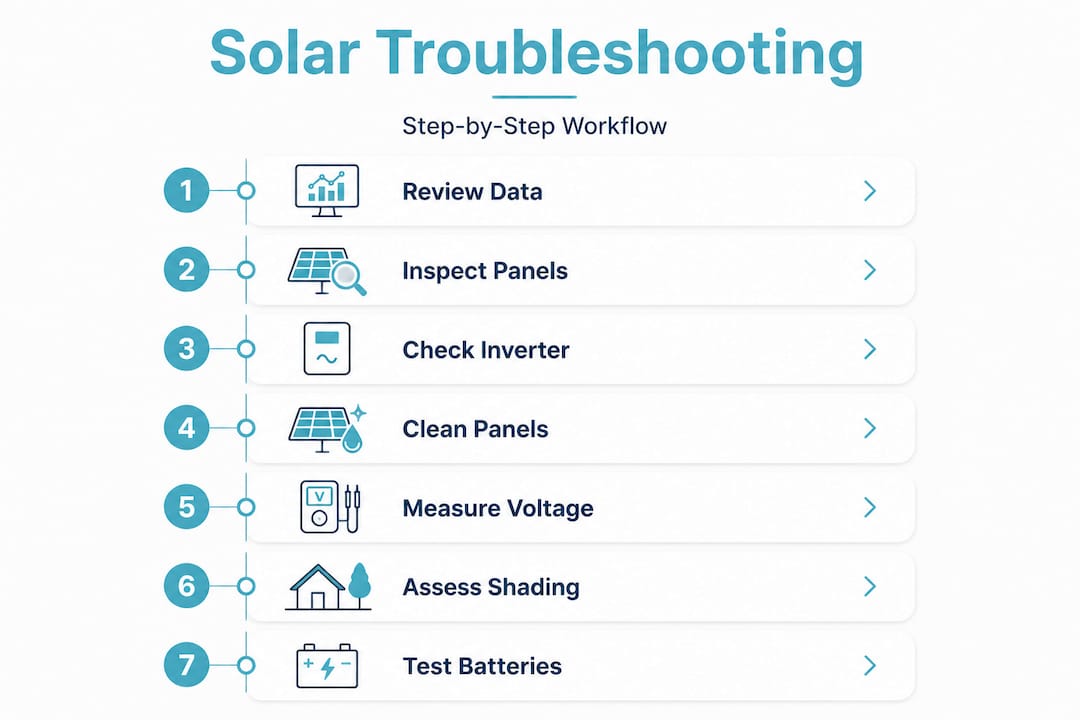
Step-by-step troubleshooting workflow
This workflow is designed to move from the simplest, safest checks to the more technical ones. Work through each step in order rather than jumping ahead, because earlier steps often reveal the problem before you need to go deeper.
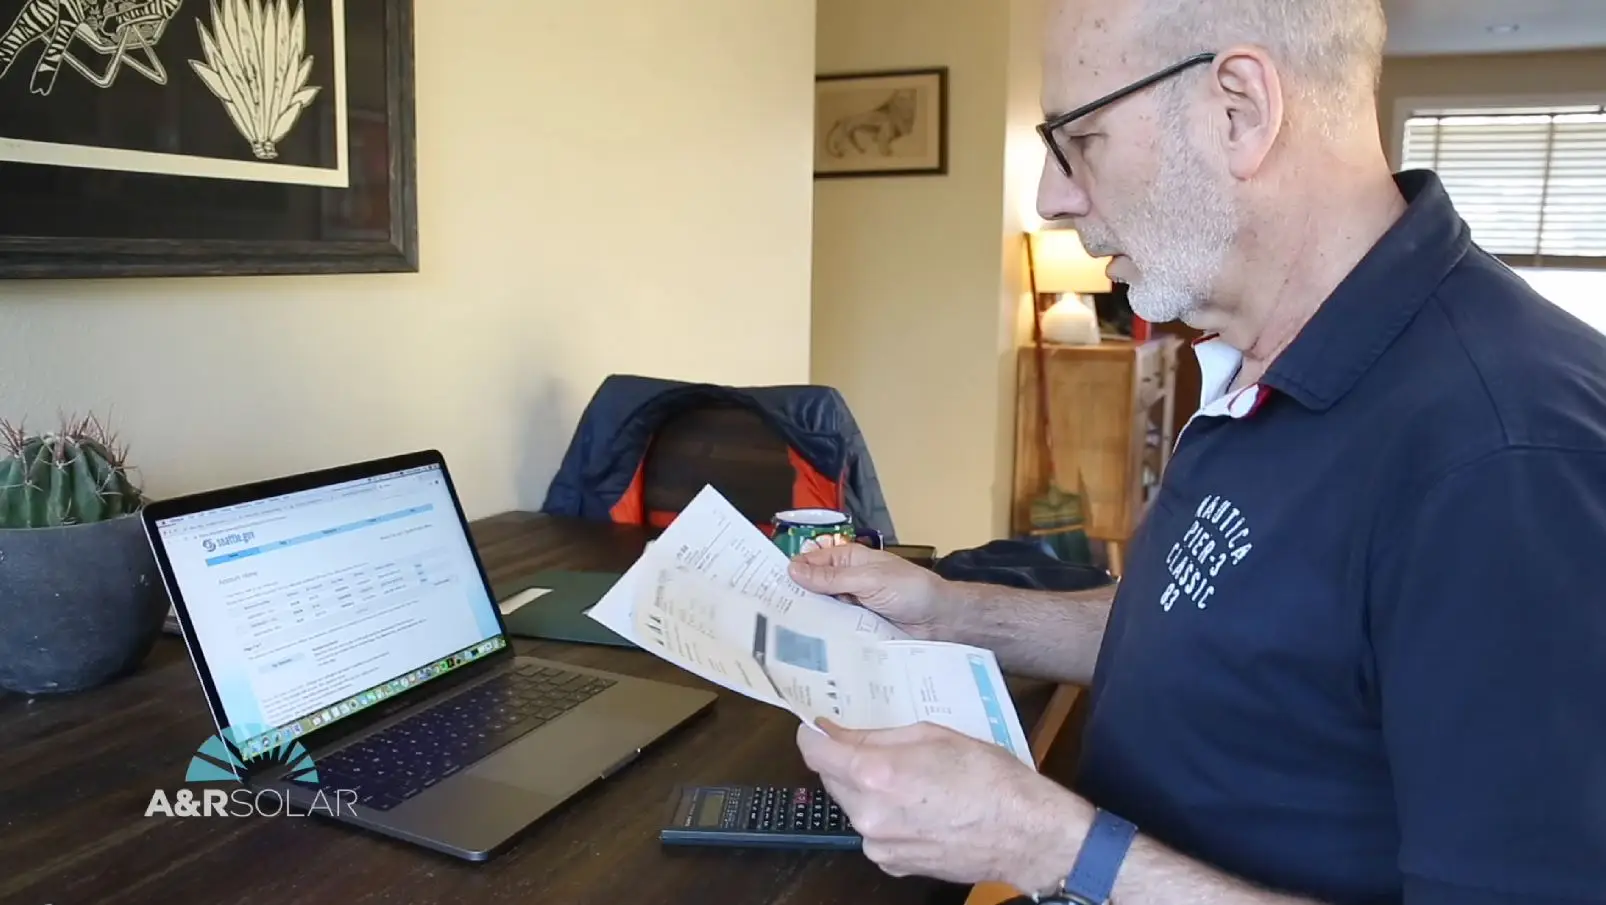
Step 1: Review your monitoring data first
Open your monitoring app or web portal and look at production history for the past 30 days. Compare it to the same period last year if that data is available. Note when the drop started, whether it’s consistent across all panels or isolated to one string, and whether the system shows any error codes. Detailed monitoring troubleshooting guidance can help you interpret what the data is telling you before you touch anything physical.
Step 2: Perform a visual inspection from the ground
Use binoculars if needed. Look for:
- Visible dirt, moss, or debris on panel surfaces
- Cracked or discolored panels
- Obvious shading from trees, new construction, or rooftop equipment
- Damaged or displaced conduit or wiring runs
Step 3: Inspect the inverter
Go to your inverter and check the status display. Most modern inverters use LED lights or a small screen to communicate status. A green light typically means normal operation. Red or amber lights indicate a fault. Write down any error codes displayed. You can check your inverter status using your inverter brand’s manual or support line to decode what those codes mean.
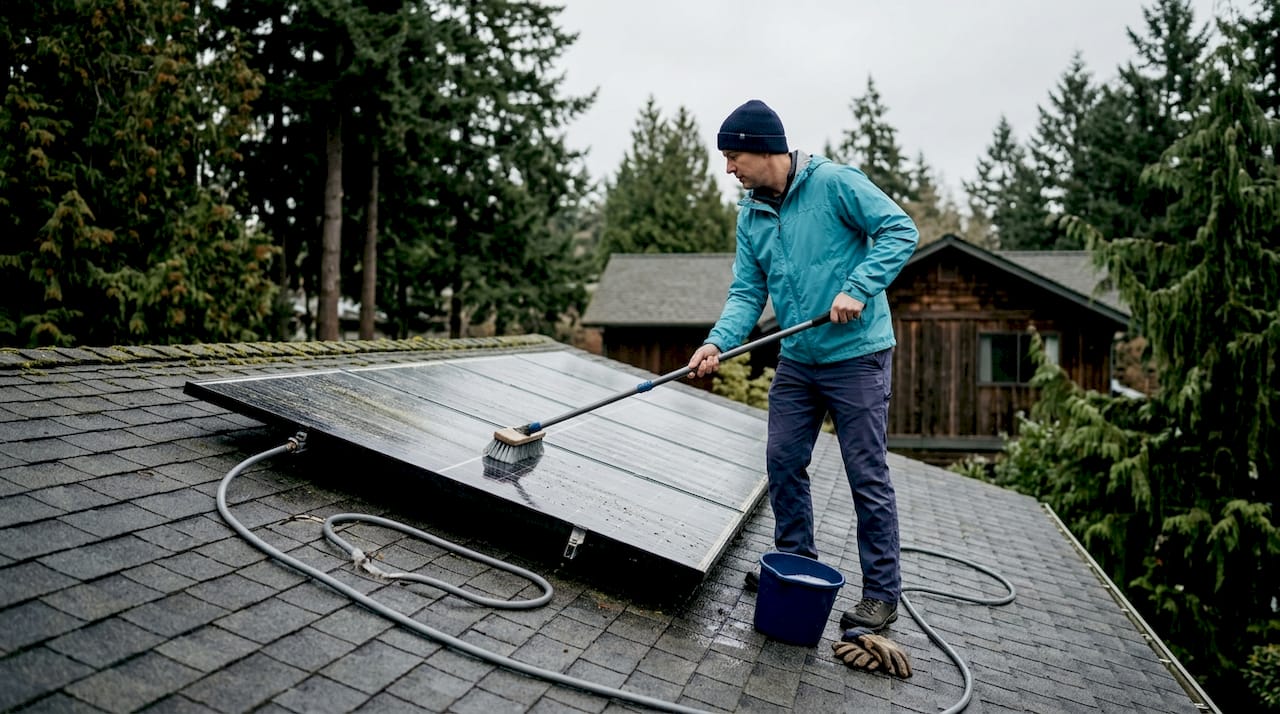
Step 4: Clean the panels
If soiling is visible, or if you haven’t cleaned panels in more than two months, proceed with cleaning. Use cool water and a soft brush. Avoid pressure washers, which can damage seals. Clean in the early morning or evening to prevent thermal shock from cold water hitting hot panels. After cleaning, wait 24 hours and check your monitoring data again to see if output has improved.
Step 5: Check voltage at the inverter input (experienced DIY only)
If cleaning didn’t resolve the issue and no inverter error codes are present, you can use a multimeter to measure DC voltage at the inverter’s input terminals. Compare your reading to the expected open-circuit voltage listed in your system documentation. A significantly lower reading may indicate a wiring issue, a failed panel, or a tripped breaker. Do not open any junction boxes or touch wiring beyond the inverter terminals unless you are a licensed electrician.
Step 6: Evaluate shading and local weather patterns
Sometimes the issue isn’t a fault at all. Seasonal sun angles in Washington and Oregon change significantly between summer and winter. A tree that caused no shading in July may block morning sun completely by November. Use a shading analysis tool or simply observe your roof at peak sun hours (10 a.m. to 2 p.m.) to identify new obstructions.
Pro Tip: Research shows that rooftop wind cooling can boost output by up to 16% compared to ground-mounted systems, adding roughly 2.3% to annual yield. If your rooftop panels are well-ventilated and elevated slightly from the roof surface, they’re already benefiting from this effect. Avoid blocking airflow beneath panels when making any rooftop modifications.
Step 7: Test battery systems if applicable
If your system includes a home battery backup, check the battery’s state of charge and any fault indicators on the battery management display. A battery that won’t charge or discharge properly can affect how your overall system behaves, especially if your inverter is battery-integrated. Contact your installer or a certified technician for battery diagnostics.
The installation and beyond resources from your original installer may also include system-specific troubleshooting steps that apply to your exact equipment.
| Troubleshooting step | Time required | Skill level |
|---|---|---|
| Monitoring data review | 10 minutes | Beginner |
| Ground-level visual inspection | 15 minutes | Beginner |
| Inverter status check | 10 minutes | Beginner |
| Panel cleaning | 30–60 minutes | Beginner |
| Voltage testing at inverter | 20 minutes | Intermediate |
| Shading evaluation | 30 minutes | Beginner |
| Battery system diagnostics | 30+ minutes | Advanced/Pro |
After completing each step in the workflow, verify your results to ensure your system returns to optimal performance.
Verifying results and ongoing maintenance
Once you’ve worked through the troubleshooting steps, verification is critical. Don’t assume the problem is solved just because you cleaned the panels or reset the inverter. Give the system 24 to 48 hours of clear weather and then check your monitoring data carefully.
What to look for when verifying results:
- Compare current daily output (measured in kilowatt-hours) to the same days from the previous year or to your system’s estimated production figures
- Check whether all strings or panel groups are reporting similar production levels
- Confirm that the inverter is showing a normal status with no error codes
- Review whether your utility meter or net metering credits are back in line with previous months
Consistent cleaning and temperature management significantly affect daily solar yields, which is why ongoing maintenance isn’t optional. It’s the difference between getting what you paid for and leaving money on the table every month.
Recommended ongoing maintenance schedule for Washington and Oregon homeowners:
- Monthly: Check monitoring app for alerts, unusual drops, or error codes
- Every 1–2 months: Visually inspect panels from the ground for soiling or debris
- Every 2–3 months: Clean panels, especially after pollen season (April to June) and after fall leaf drop
- Annually: Schedule a professional inspection of wiring, connectors, and inverter performance
- After major storms: Inspect panels and conduit for physical damage
Pro Tip: In the Pacific Northwest, the spring pollen season is one of the biggest contributors to soiling losses. Scheduling a cleaning in late April or early May, right after peak pollen, can recover meaningful production losses before summer’s peak sun hours arrive. Review solar best practices for region-specific guidance on timing and technique.
Now that you know how to troubleshoot and maintain your system, let’s take a closer look at expert advice that goes beyond the basics.
A deeper perspective: Why efficient troubleshooting matters most in the Northwest
Most solar troubleshooting guides are written for sunny climates in California or Arizona. Washington and Oregon are different. Our region has extended cloudy seasons, heavy pollen from Douglas firs and alders, frequent moss growth on north-facing roof sections, and dramatic seasonal variation in sun angles. These factors mean that what counts as “normal” output in July looks nothing like what’s normal in January, and that difference confuses a lot of homeowners.
The most common mistake we see is homeowners calling for a service visit in February because their output is down 40% from summer levels, when the real explanation is simply that Seattle gets about 8 hours of daylight in December versus nearly 16 in June. Understanding your system’s seasonal production curve, and comparing month-to-month rather than season-to-season, eliminates a significant portion of false alarms.
The second most common mistake is waiting too long to act on a genuine problem. A homeowner who notices a 15% drop in production and waits six months to investigate may discover that a single failed panel or a corroded connector has been dragging down an entire string for half a year. That’s real money lost, and it’s avoidable.
Efficient troubleshooting, done proactively and systematically, is one of the highest-return activities a solar homeowner can do. It reduces unnecessary service calls, extends the life of your equipment, and keeps your system performing at the level you designed it for. Reviewing advanced maintenance tips and tracking your own local production benchmarks throughout the year gives you the data you need to catch problems early, before they compound.
The Northwest also rewards homeowners who pay attention to airflow around their panels. Rooftop installations here tend to benefit from coastal and valley winds that help keep panel temperatures lower than in inland hot climates. That’s a natural advantage worth protecting by keeping panels clear of debris and ensuring nothing blocks the gap between the panels and the roof surface.
Connect with trusted local solar service providers
When your troubleshooting workflow points to a problem that goes beyond cleaning or a simple reset, working with a local expert makes a real difference. A&R Solar has served residential customers across Washington and Oregon for over two decades, and our team understands the specific conditions that affect solar performance in this region.
You can browse our solar case studies to see how we’ve resolved real performance issues for homeowners like you. If you’re in Oregon, our solar repair in Oregon team is ready to diagnose and fix issues quickly. Washington homeowners can connect with our solar repair in Washington specialists for the same level of responsive, expert service. We’re employee-owned, B Corp certified, and committed to keeping your system producing at its best for the long term.
Frequently asked questions
How often should I clean my solar panels to prevent soiling losses?
Cleaning every one to two months prevents soiling losses that can add up to 10% monthly, with the most critical cleaning window falling after spring pollen season in the Pacific Northwest.
What temperature should I be concerned about for panel performance?
Panel surface temperatures around 64°C can cause daily losses up to 12%; cleaning and inspecting during cooler morning hours helps keep panels operating efficiently.
Does rooftop wind cooling really improve solar yield?
Yes, rooftop wind cooling boosts output by up to 16% compared to ground-mounted systems, making proper airflow beneath rooftop panels a genuine performance advantage.
What is the first thing to check if my solar system stops producing?
Start by reviewing your monitoring app for error codes and recent production history, then do a visual inspection of the inverter status before moving to any physical checks on the roof.